From Design to the Manufacturing of a cardboard project
The Concept
When I create a new cardboard object, I have two objectives:
* On one hand, to satisfy my need to design new forms, to create an original decor, to take on small technical challenges, and to experience unprecedented situations.
I draw my inspiration from my travels, my readings, and my encounters. I also like to dedicate my creations to exceptional women, whether they are known or unknown, to pay them a sincere tribute: Simone, Joséphine, Gisèle, Lycette, Victoire, Anna, Alicia... and many others are part of my creative universe.
* On the other hand, I wish to share my knowledge, explain my techniques, and make my creations accessible by writing step-by-step guides and tutorials. It is a very interesting exercise in simplification and clarification, the result of many years of teaching courses. I learned to explore all possible avenues of explanation, to anticipate potential misunderstandings, and to simplify concepts of geometry or logic. These downloadable tutorials, available in French and English, allow cardboard enthusiasts to benefit from total autonomy.
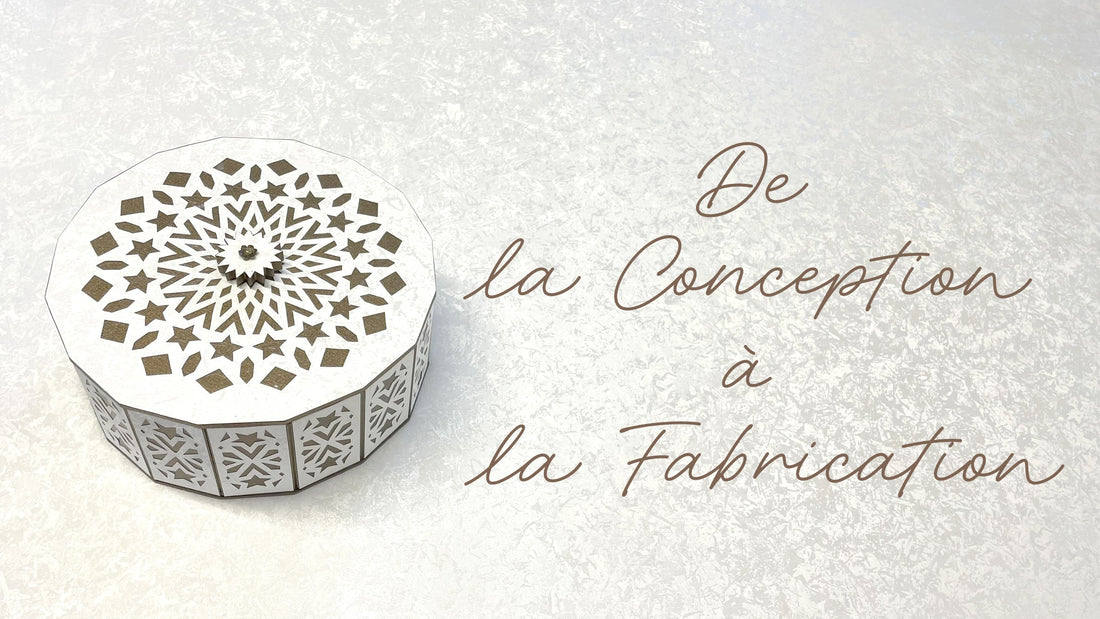
I chose to present here the design and realization of the Alicia Box.

The Sketch of the Alicia Box
My goal here was to design a box made of cardboard and paper, featuring a base with 16 outer facets and a cylindrical interior, topped with a removable lid in the shape of a hexadecagon. The challenge was to develop a simple system ensuring precise alignment between the facets of the base and those of the lid.
Moreover, I wanted to integrate a paper lace decoration to enrich the whole, reminiscent of the aesthetics of a stained glass window. Paper lace is a new way to obtain a decoration in cardboard work that allows for highlighting the papers in a different way.


The Choice of Papers and Cardboards
The choice of papers is a crucial step at the beginning of the design. It is essential to take into account the technical characteristics of the papers, such as weight, dimensions, flexibility, as well as their reaction to varnishes and glues, whether the papers are industrial or handmade. It is also important to wisely combine fancy and/or solid papers, considering their positioning in the designed object, in order to achieve the desired result.
For this project, a minimum of two different papers is necessary:
* A main paper, which will serve as the primary color and must be durable, as the box will be handled, placed, moved, and picked up. For this, I chose a pearlescent white faux leather paper of 220 g/m².
* A paper for lace, which will be thinner and very contrasting compared to the first paper, in order to highlight the lace. I chose a bronze paper of 120 g/m².
3 thicknesses of cardboard are used for this project: a cardboard of 0.8 mm thickness, a cardboard of 2.5 mm thickness, and a cardboard of 3.5 mm thickness. I only work with good quality wood cardboards; recycled cardboards do not allow for the same beautiful finishes.

The construction of the base
Several steps are necessary:
1. I precisely cut the cardboard disks of 2.5 mm thickness and the cardboard rectangles. Several markers are placed to anticipate future operations or gestures. I then assemble the first elements. From this stage, the positioning system necessary for the correct placement of the facets of the base and the lid is prepared.


2. I create the principle of the lace in Adobe Illustrator. I adapt the base model to the dimensions of the box. Here the lace will be installed on the inner bottom of the box. All my models are worked on A4 format so that they can be easily printed by future people who will create the object.


3. I install the first paper lace and continue with the intermediate dressing steps, both inside and outside: dressing the edge, lining with cardboard, and filling. Although these steps are invisible on the finished object, they ensure an exceptionally high-quality result.

The outer covering of the base
Several steps are necessary:
1. I prepare 2 strips of cardboard, one of which is lined with a rectangle of cardboard 3.5 mm thick, scored into 16 equal parts. The whole is then fixed to the outside of the box. It is precisely at this stage of assembly that the outer hexadecagonal shape is revealed. This multifaceted surface is then covered with a first fine paper, here in bronze gold.

2. I adapt the lace model, designed in Adobe Illustrator, to the dimensions of the 16 outer facets of the box. The lace is then cut with a scalpel, carefully isolated, and then installed and glued onto each of the facets.


Finishing the box and lid
1. I cut and place a decorative trim on the upper edge of the box.
2. I cut, dress, and install a hexadecagonal plate of 2.5 mm thickness under the box.

3. The actual outer and inner dimensions of the base define and fix the dimensions of the lid.
I cut the various necessary cardboard pieces, in the shape of a disk and a hexadecagon. I install the lace identical to that of the bottom of the box. I install the element that will allow the lid to be positioned relative to the box. I also make the cap, which is made up of several layers of cardboard.


Writing the tutorial for other enthusiasts
Writing the downloadable tutorial is just as exciting an exercise. I consider a tutorial successful when it allows everyone to create the object independently. Here are some Alicia Boxes created by other enthusiasts, who have managed to make the creation their own by adapting the colors and modifying the style.
It's simply wonderful!

